Showing posts with label Sewing. Show all posts

29 March 2013

Proud as a...


'Only' 11 months after checking out the book from the library and working on it here and there, I finally finished up this little project.
I thought this project absolutely PERFECT for my friend whose pseudonym is Gwendolyn Peacock. 

It took me a bit of time to collect the fabric I wanted to use. I quickly discovered I would not be able to find the Liberty fabrics specified. At the time, I was well in the throes of my batik phase. The body fabric was a pretty easy decision, but I didn't know how I planned to replicate the tail feather 'eye' look. I even went so far as to buy some feathers to use.

Every so often, I'd find a fabric that I thought might work, and would buy a fat quarter here and there. I also needed to find the pins and sequins I'd use. At the beginning of March, I felt my prayers were answered when I came across this exotic piece of Ombre Marrakesh by Michael Miller. I saw lots of peacock feathers and a varied range of tones. As it turns out, this beautiful print is only seen if your look at the underside of the 'feathers.' The wrong side has smaller batik pieces appliquéd onto them.

For the eyes, I finally cut into my new felt collection. I once imagined I would plan my first cut into the pristine pieces of felt as a ceremony or sacred event. Reality—I tugged a corner big enough to use from the stack, chopped off each color, and smushed the remainder back into the stack. How quickly we forget the once regal and revered.

This is the finished project, only a mere 50 weeks later! I gave it to Gwen this past 'Gwendsday' and she loved it! I know it'll have a good home. We both remembered one of the first gifts I gave her was also a homemade pincushion—an Araucana chicken.

An extra treat was that my project was mentioned in OKCMQG's March Flaunt Your Finish post. Special thanks to Leslie for doing such a wonderful job gathering our write-ups and photos, editing, and sharing our finished projects! Unbeknownst to me until recently, I've been a big fan of Leslie's for a couple of years. She's done a couple of houndstooth quilts, including a PLAID ONE—the first one just a month or so before I did mine for Baby Cairo. I bet I came across her blog way back then while doing research and was duly amazed and inspired.

31 January 2013

In dangerous hands...

I don't always know why I buy things.

Sometimes, it's just because they are pretty. My friends know this about me. Especially Gwen.

Hence, the beautiful box of 108 pieces of felt from WoolFeltCentral.com, Gwen's felt source. For me, it is as much about the acquisition as the application. Once I had these gems in my hot little fists, I knew I had to—wait for it—catalog them! Sigh. Roll out a blank Excel spreadsheet and get to work! I love this stuff.

A couple of years ago, when I started organizing my fabric via a color system, I discovered Joen Wolfrom's Ultimate 3-in-1 Color Tool. She assigns a number from 1 to 24 to colors on the color wheel, and then sub-numbers for values/tints. When I get new fabric, I photograph it, assign it one of these color numbers, and then add it to my visual data base. When the images are sorted by color name, they display in spectral order. Bliss! It's not a perfect system but mostly does what I need.

So, I made the spreadsheet using the information the seller. This included their colors' names, the order in which they were packed, and the DMC floss match color they provided. I then went on the quest to find or create swatches for all 108 colors and then put the appropriate swatch on the appropriate row. Then it was time to assign the Color Tool numeric value. And if all this wasn't enough, I then assigned two different tonal values to each swatch. These values came from looking at each swatch under a red, and then a green lens. All tolled, this took much of one weekend and a few afternoons. Here's a screenshot of one of the simpler sorts. If it's not worth obsessing over, is it really worth doing? Ha!

On the more 'normal' side of life, I think it's fair to say I have friends who like felt. And actually make things from felt—REALLY darling things from felt. From Gwen, here are five monkeys waiting to jump on a bed, and a waterspout, spider, and sunshine. Pretty dern cute, eh?

Even if I never make anything from my beautiful pieces of good quality felt, I really enjoy having it all the same. And, when/if I do, you'll see it here!

Also felt-related, I relented and finally purchased a Christmas stocking kit, on clearance. Some of my friends make these and seem to enjoy the experience. I'm still a little befuddled about the process, but now I have a chance (and plenty of time) to try one, too! I haven't done that much up-close, detailed hand stitching in recent years, so this will certainly require a different set of skills. Truth be told, I loved it for the mouse and the candy cane! I'll let you know how it goes.

29 January 2013

Spokes, Totes, and Hand Warmers...

Last spring/summer, I became friends with Kelsey. I first became aware of her when she was in a series of some very funny sermon series bumper videos. It was a series about dating. Here is the link to the first of three* (see below) videos she did. What a funny way to get to know someone! She and I knew many of the same people, especially media team staff/volunteers. It also turned out that we'd just started attending a community group her parents led.

We got to know each other better over some Starbucks coffee and church activities. Within a few weeks, she adopted me as her 'Second Momma.' What an honor! I was tickled!

Kelsey and her roommate, Hailey, started riding bikes. Seriously started riding bikes. As in 'cycling!' They joined a group of mutual friends who have a cycling group. Their organization's name is Rollin' With the Homies. Here's their patch/label, a Group Fly design.

Fast forward to mid-September and Rollin' With the Homies is riding in the Bike MS: The Mother Road Ride | Tulsa to Oklahoma City. It was a 150-mile ride from Tulsa to Oklahoma City, with one overnight stop in Chandler, Okla, and benefitted the National MS Society. Kelsey was riding the first leg of the ride, and Hailey was doing both. We decided we want to go to Chandler and welcome them there. 

We got there with some time to spare. After a bit, we got word they were coming in. Click, click, click. I've gotta confess I love the little square single-shot photo on the right most because I know Kelsey's just saw us! The one next to it is what everyone else saw. Beneath is one of the two of them. Can you believe how lovely they look after cycling 75 miles up and down the hills?! Guess there's something to be said for good training!

I knew I wanted to have some sort of surprise or trophy for the girls as they finished the first leg of the 150-mile ride. But what? A week before, while at Quiltworks, I saw this fabulous cream and dark blue fabric made into a tote bag. Free pattern with purchase of fabric? YES! I was especially fortunate to find two fabric color combos so I could make distinctly different bags for them (roommates having identical bags was impractical). And I lined them. I was concerned they might not be the most useful gift, but I LOVED the look, so took my chances. I presented the bags after they arrived and was so thrilled they loved them. Yay! Turns out they were perfect for carrying their helmets and shoes. Tah dah!

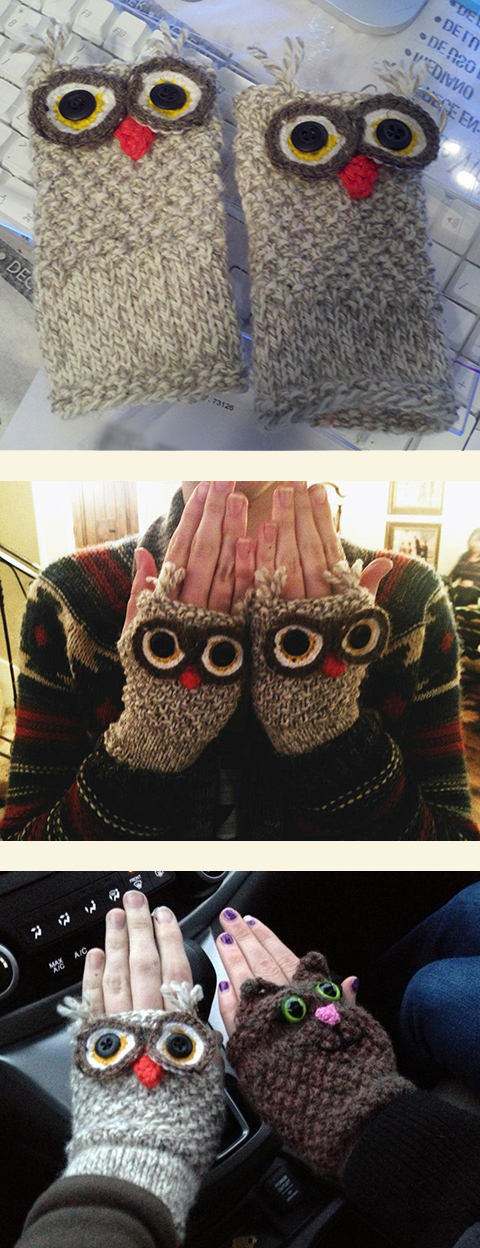
A little more time travel—Christmas. I came across a knitting pattern for fingerless gloves—plain, but a pretty moss stitch. After making a pair for myself, and a little inspiration, I knew I wanted to make some for Kelsey that resembled owls. I so enjoyed making those that I thought Hailey, avid cat lover, might get a giggle out of kitty ones. So, here ya go! My mind is a mysterious (and furry) place!

The owl eye and beak motifs came from the an Amigurumi Pattern I used in making Kelsey's little owl friend, Wilbur (see post). Then I added a couple little tufts for 'ears,' and there ya go.

For the kitty ones, I just added plastic cat eyes, pink nose, mouth stitching, and triangle ears. This particular pair was bigger than the owls, but I think it made the kitties rounder looking.

I'm so glad I have these lovely young women in my life to enjoy, cherish, and pelt with homemades! And I get a daughter in the deal! Wow!

*(Okay, here are the second, and third video links. Enjoy!)


11 January 2013

Christmas was...

It's been so long since I posted any creations, I really don't know where to start. I'm picking a couple of random items I made within a few days of each other. (Turns out I'm making a few shorter posts in near succession.)

New rug & grand puppy
I promised my son Matt's girlfriend, Ariel, I would make her a fabric bowl. I'd had a couple of ideas along the way, but didn't get around to it until just before Christmas which worked out great because she got a new area rug for her living room and those new colors inspired this new bowl.

Taking nothing from my other bowls made to date, I think this is my favorite. This one reminds me of a raku-style pot. I was always going to use the slate blues, and maybe some browns, but the pop of mixed colors the rug suggested really made this one stand out. Shown below are swatches of the three fabrics used to make the bowl. The third one (round discs of color) are from a collection I've recently discovered and absolutely love. It's from Moda and is called Juggling Summer from Zen Chic.

Then here comes Christmas. I was invited to Ariel's mom/step-dad's house in Tulsa for their family gathering. I wanted to make a hostess gift for her mom. I was still desperate for an option the night before and asked a friend of mine who happened to be on Facebook overnight. She suggested I make one of her Task-It™ Baskets. I'd bought the pattern a few months ago and have already made a few of them. After a little hemming and hawing, it wound up being a great idea. Martha also told me that a box of Keurig 18-count K-cups fits perfectly in it. Bazinga—perfect hostess gift. I hated parting with these two wonderful fabrics, but I guess that makes the gift all the more special. (And, I replaced the fabric a few days later, of course.)
And then there were a couple of Christmas ornaments. Years ago, as a child, I had a little felt mitten into which Santa would leave a dollar bill each year. I am not quite sure what's happened to that mitten, but I was feeling sentimental about it and decided to create a new one. This started me on my quest for BETTER felt. What's readily available in sheets at Hobby Lobby is pretty pitiful. This particular felt was not their standard white, but a thicker version with glitter. (I've got a whole post about felt coming soon.) Apparently Santa has become pragmatic over the years. I got a note from him this year saying only little girls under 13 still get dollars, but he's held on to my last 'Little Girl Dollar' since 1969, and with interest (complete with CPI inflation calculator data), I got $5.93 (rounded up to $6.00). 

And then there were the Froebel Stars (Fröbelstern). A friend in our D'art group showed these to us just before Christmas. They are part of her German heritage and she'd made and boxed dozens of the beautiful ornaments to accompany the Christmas cards she sent out this year. I was immediately taken by them and came home and started folding some. I found the easiest material to use was gift wrap ribbon. It provides long, consistent widths. I first tried cutting strips of scrapbook paper but had mixed results. The star on the left is the traditional 3D version. On the right is a modified '2D' version that can be mailed flat. It loses something in the flattening, but is still interesting.

T-shirt quilt...


This was the first I've ever done. When my friend, Denise, said she'd saved all of her daughter's T-shirts since she was little and wondered if I knew how to make a T-shirt quilt, I figured—sure. The learning curve wasn't too steep. Some parts of the process were definitely easier than others.

Part of my process is to layout my design on my computer first. I took photos of all the fronts and backs I was going to use. After I figured out some consistent measurements, I chose which designs/colors would be where. I presented Denise and Kayleigh the computer images for their approval. The chosen layout was without the sashing and border (bottom image).

Once I got all of the shirts cut, I adhered each knitted panel to fusible interfacing to stabilize each panel. After that, I joined together each column of panels and then each row together. And this is where it started getting heavy. Ah, ha. Add to that a layer of fleece (used as batting, and another layer of fleece for the backing, and you get one rather ungainly mass of fabric. After a couple of hit-and-miss tries (read: stitching and ripping out), I wound up hand-basting the entire quilt sandwich together. I think  this totaled ten rows of basting—multiple runs horizontally, diagonally, and vertically. And though that was a bit time consuming, it made quilting all the layers together much easier. I just stitched-the-ditch and called it done. I found I also need to make my binding narrower. This one wrapped a little wide over the backing. Somewhere along the line, I got the idea I needed to make 3" binding. After further investigation, I think 2.25" might work better.

Anyway, here's the finished piece. I appreciated them waiting over 90 days from start to finish. Rumor has it, another one of their family members wants a T-shirt quilt, too. Because I 'gifted' my labor, I have no idea how much I'd charge for something like this. Early in the process, I was thinking, while I was on a roll, I wanted to make one for myself. After I was done, I decided I needed a break.

27 August 2012

More bowls...

Here are the most recent bowls I've made. The aubergine and crimson one was for our daughter-in-law. They are in the process of updating their home and hopefully this will fit in with the facelift.
The lighter color one was for a friend who moved to Tulsa. She's decorating a new home and these are her three colors.

Bowls minus "B" minus "s" equals OWL!
My sweet friend Kelsey was telling me about collecting owls when I saw her several days ago. I happened to come across a cute owl pattern on Etsy, via Pinterest. That pattern was sold out, but I came across a few more. I made a sample, liked it, then set out to make one just for her. He's been named Wilbur and she sent me a photo of his new home. I'm so tickled!

SmartHours—winding down...

SmartHours runs through September so there are only a few weeks remaining. Our newest billing was last week and here's the highlights. Soley due to SmartHours pricing, we saved $81.63 this billing. This billing cycle was $75.61 less than last year at this time, and that includes our moderate run of 100˚+ days, including some 109˚ and 113˚ days! We used 97% if the kilowatt load this year compared to last. And, had we been on SmartHours last year, our bill might have been $64 less. All tolled, so far we saved just over $350 this summer soley due to SmartHours pricing and time of use. And our bills have been $484 less this year than last from May through July.

Based on this year's experience, I'll gladly sign up for SmartHours next year. I can't think of any reason why I wouldn't. The savings are incredible and I can't really think of a downside. Once I got over Tom's initial misgivings, it was smooth sailing. I know we could have saved even more if we were uber vigilant, but for a couple of comfort hounds, we did well. I'll have one more summary in late September—stay tuned!

10 August 2012

Fabric bowls...

Two fabrics + 80 feet of clothesline = Fabric Bowl
We were invited to a friend's 50th birthday celebration. I knew I wanted to make Leesa something, but what? As it worked out, I was able to wrap each of the two fabrics two ways which gave me a four-level range of gradation. When I purchased the fabric, I was thinking of mimicking a zebra pattern. I knew, a few rounds in to the base, it probably wasn't going to succeed. But I kept on, lightening the black/white balance until the top four rounds which were my darkest tone.

Made from 2011 BOM Batiks
A few days later (I think that was last night) I started my own bowl. Months ago when I was working on my BOM batik quilt, I saved .5-inch wide strips intending to make a fabric bowl someday. This was also before I took the class. From the background color fabrics, I cut the supplied 3-inch wide strips down to 2.5 inches. I started with the dark tones, worked into the middle and light tones, and finished with more dark strips.
Paper piping ready to be wrapped
Instead of using clothesline, I tried out some paper piping cord. I bought this stuff decades ago when I was sewing spa and makeup bags from vinyl-laminated fabric—it was c.1988-1991. One thing I really liked about using this piping is that it is on a spool so unwinds easily with no tangling or twisting. I LIKE. I worked directly from the spool; wrapped the cord at the sewing machine; then stitched a bit and wrapped some more. I like the shape of this one—a little curvy and a turned down lip. Got this one done mid-afternoon.

More Giardiniera
I've been wanting to make something special for a young friend of mine from the same fabric as my Lemon Pepper Poppy Quilt. I cut mostly .75-inch strips from the remnants and arranged them into a pattern I liked. This wound up being another bowl with a 6-inch base (as were the two previous ones above) with a slightly turned under lip. I loved it for her! And she loved it, too!

I've got a couple more bowls to make for friends and family while I'm still in the bowl-building groove.

from The Gourmet Yarn Co.
Two weeks ago, I took a class at The Gourmet Yarn Co. on knitting the Spectra Scarf designed by Stephen West. Owner Margaret Schroeder taught the class. It was a sluggish start but after two hours, we all got the hang of it. I've been working on it off and on and am pretty pleased so far. The only part I didn't like was finding a mistake I couldn't live with 70 rows back. Yup. A big part of knitting is fixing mistakes. I'm getting better at it. I pulled the 70 rows; managed to get all the stitches back on my needles; and am now back about where I was before. I've learned a couple of things through this project. First, I've been purling incorrectly for years. I was throwing my yarn the wrong direction and twisting my loops. Ugh. And two, with long sessions of knitting, I've much improved my hand positioning/use and cut down of lots of extra repetitive motion. I am only about 25% done, so there's lots to do. It takes a certain kind of faith/folly to knit in the summer on 113˚ days while dreaming of cooler temps down the road.
Tosh Merino Light (Ruby Slippers) and Crazy Zauberball
I fell in love with this scarf when I first saw it on TGYC's Facebook page in a near-Cherokee Red and blues/gray variegated yarns. They were out of the red when I bought my supplies, so I chose a plum and orange/taupe/gray/purple variegated yarns. I still think I'd like to do a red one that will remind me of Fallingwater's tower of windows.

22 May 2012

As seen on TotallyTutorials.com...

Blogspot now has a new dashboard interface which gives bloggers statistics on page views and such. After seeing I had over 1,200 page views in April, I discovered my Pet Food Bag tutorial appeared on Totally Tutorials on 14 April!!! I don't recall when I submitted it to be considered, but I certainly did not know it had been published. How exciting!

When I made them, I was thinking what great book bags they'd be because they're so durable. And then I took it with me to the library. And it crunched and crackled which sounded very loud in its environment! Oh, well. :-)

Big 'n' bright Granny Goose...

Here she is, in all of her painted glory! I got to the point where I was ready to call her 'done,' and this is it. Toward the end of the painting, I still wasn't happy about the balance and decided to add a few kernels of deer corn, just like what we've fed her over the winter. Looking for these three kernels reminded me of the time in college when Buddy Centini was looking for 'perfect' popped corn to serve as models for a soft sculpture we was making. Hey, that was only 37 (!) years ago! Eek!

The frame came from a mirror I bought a few years ago. It broke, but I just stuck it in a magazine rack and forgot about it. When we were having new furniture delivered, I came across the mirror and frame, tossed the mirror and discovered the frame fit my painting perfectly. I added the bright yellow-green, and voila!

I am happy to have it done. There are other processes I'd like to try, like much wider brush strokes and more impressionistic color. But there's time for that. I absolutely love this artist's (Morian - a sample of her pet portraits process) style and credit that excitement for starting my own painting. I plan to meet with her this week about something unrelated*, and will take Granny Goose with me. (*I won a giveaway from her blog.)

In the bag...
Another project I started and finished last weekend was a tote for a new friend of mine. Kara recently graduated OKC-OSU with a degree in Sign Language Interpretation. As it happened, a day after she gave us her graduation announcement, I came across fabric at Quiltworks that was the ASL alphabet! I wanted to spell her name from it and apply it to something I'd make. It took a few weeks, but this past Saturday, I finally got serious about it and put this bag together. Fortunately and I had the fabric and materials I needed on hand here at home. I used one of those magnetic fasteners and installation was quite simple! It took the whole day, but was glad to get it finished by evening. I gave it to her the next day and was thrilled with its reception. Tah dah, another project done!

SmartHours update...
As I mentioned in a recent blogs, we've signed up for SmartHours through OG&E, and I relay my experiences on my blog.* I've been receiving updates on the amount of energy we're using, via weekly reports. Our usage continues being quite high compared to our neighbors, so it will be interesting to see how the SmartHours plan works when it OFFICIALLY begins on June 1. Thus far, our thermostat settings on our new thermostat have worked out pretty well. With a few of these already too warm days, I've adjusted some of the immediate settings for comfort. Once we get into June, I'm sure I'll have some more thoughts about our experience! We're looking at highs of 90˚ all week. Here comes summer!

*This is a sponsored post. As always, my thoughts and opinions are my own.

08 November 2011

Time's a wastin'...

It's only been a couple of weeks, but it seems like ages since I updated. Okay, first things first—you're invited to the Sinple Gifts Artists Market at Gwen's house THIS Saturday! I do hope you'll come. Several artists will be selling a variety of studio-made specialties. I'll have a few items for sale (hooded towels, zipper bracelets [as seen on Pinterest and in my last post], and lanyards), but you really need to come see and buy some of the treasures Gwen's got—aperns, wallies, dollies, and more!

I picked up my last BOM block the other day. As suspected, I don't get the outer border pieces until December, rounding out the whole 10-month experience. Toni, the lady who assembles the packets, mentioned a few weeks ago that one of the blocks in the November packet was quite trying. I've only done the preliminary prep for the block so don't know whether or not it will give me headaches.

A few updates...

Sock Monkey is all knitted. He even has a special little hat I improvised—kind of an upside down flower pot with a pom-pom. Don't know what else I'm going to add, but he looks like he could use something. Here he is watching Rocky sleep.

The Halloween costume came together so well. Tom went to the Epic youth night on October 26 at church where some of the kids also dressed up. He practically got treated like a celebrity. The teens got excited about seeing Mermaidman (from Spngebob Squarepants) like the little ones do when they see the Toy Story or Sesame Street characters. He even had some candy Crabby Patties to pass out early on. I can honestly say I never thought I'd ever be teaching my husband how to put on tights!

This is a little something I finally got around to making. It's a new take on my Scrabble® wall hangings. I thought a pillow would be a nice option because this friend is doing a bit of traveling these days.

Well, have got to get some things ready, worked on, and organized for the sale this weekend. Please stop by if you can! You'll see a wide variety of gifts for yourself and others! We'll love seeing you!

One more thing (okay, maybe a couple of things)...
I love feedback. I'm an artist and, well, we crave validation. Please feel free to leave comments, ask questions, or make suggestions. Thanks in advance! Although I'm not posting as consistently as I'd like, make sure you know when there's a new post by entering your email address above at Follow by eMail.

29 September 2011

BOM Seven...

12 September Here's how the newest Block of the Month should go together. I am putting off cutting/piecing this until I get another time-sensitive sewing project done—hooded towels—several. In addition to making larger hooded towels (for larger child or small adult), my friend Autumn suggested I could make infant-size ones—three* per beach towel. I bought four beach towels on clearance this late time we were at the BX and have a dozen small made.

After a hiatus of almost two months, I've bought a couple dozen fat quarters, and some other yardages—
mostly coordinating patterns/colors for binding the hooded towels. But I found this incredible border print that absolutely took my breath away!
I Present to You: Effervescence by Amelia Caruso for Robert Kaufman fabrics. The artist, Amelia Caruso has some great paintings that just bubble off their industrial surfaces. I bought two yards of this, one yard of the stripes, and only a fat quarter of the green (it's all they had). Here's the whole line. Sigh.

Fast forward—it's 17 days later
I got all the towels sewn. There were 26 altogether, but I think a dozen of them might be practically given away. *I misread Autumn's instructions and made the hooded towels from beach towels quite a bit smaller than useful—three from one towel instead of three from TWO towels. Am hoping she could sell them cheaply for baby dolls or something.
For the solid color towels, I attached a print binding. For the white ones with color stripes, I simply sewed the hood into the towel's hem, and usually put some solid binding (taken from the solid towel's end hem) along the hood edge. I made extra ones in red or red/white in hopes shoppers will buy/order them on which to have the OU logo machine embroidered. I've already heard from my OSU friends and the reason I'm not making extra orange ones is that Autumn has only purchased the license to use the OU logo and not the OSU logo. In any case, GO COWBOYS!

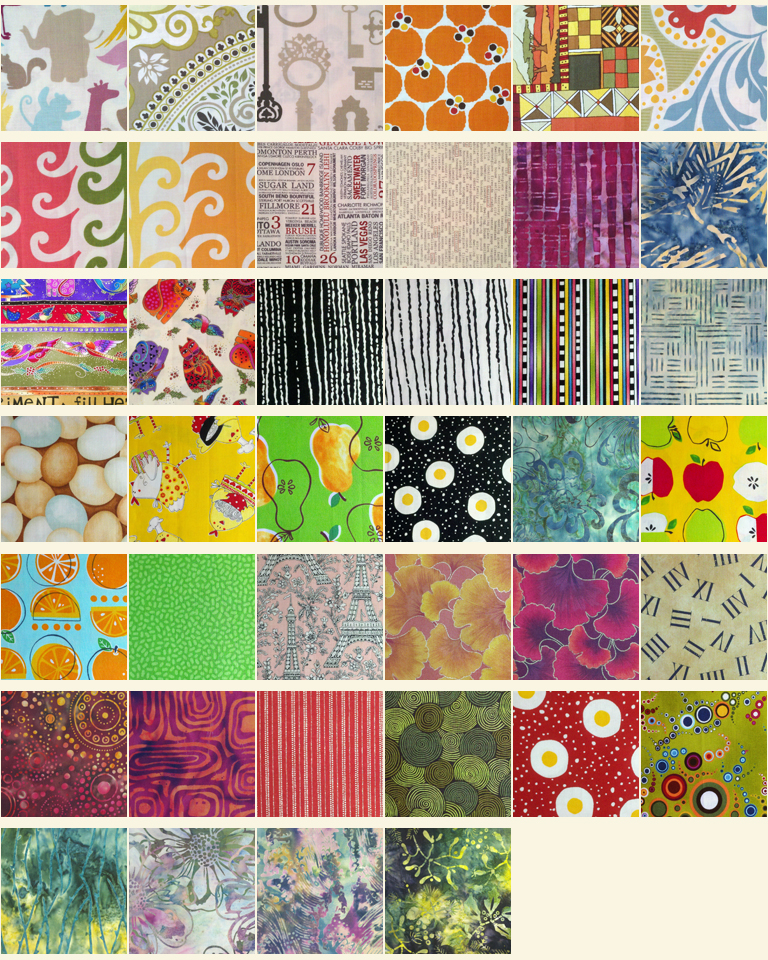
And I jumped back on (or fell off?) the fat quarter wagon. I've made up for lost time and recently bought 40. I find myself amused with what colors/patterns may catch my fancy any given days. And do I think with a plan in mind? Yes, and no. "It's pretty" is usually good enough for me. I am thinking a little downstream that I'd like to do an art quilt in batiks, and find myself buying batik colors for that someday project. Speaking of someday, someday I'll have to show you how I document my fabric inventory!


Pinterest! This is my new online time-gobbler. You look around the Web and find photos, videos, and pages you like and 'pin' (kind of like tagging) them to your personal 'boards.' Here are mine—click the link and see all my boards and pins. I think this is great for the middle age brain—fleeting glimpses can be saved and revisited, often! I think one can create as many boards, and pin as many items as they wish. Shown is a screen shot of the index page of my boards. For example, I've got a board called "Zentangles® and More Drawing." I want to get back to Zentangling (quilting displaced my initial interest last winter).

Last weekend, I finally got around to my September BOM. As I was cutting the pieces from the month's fabric allotment, I came up short (again) on one of the pieces supplied. I know they're getting tired of me coming up there showing them where they went wrong, but ya gotta know I'm kinda tired of being shorted. It makes me hesitant to subscribe to another BOM there.

But here it is. Month number seven's BOM! I'm looking forward to finishing it in a couple of months, then choose its binding and backing, and get it quilted. There's a guest room bed on which it might fit, but am thinking, especially due to the fact our pets have free run of almost every space, it will become a wall hanging.

Can't believe tomorrow is already the last of September! My minds has been stuck in April or May, so SWOOSH went all those other months. I've got that speeding ticket to pay off regardless of the fact the officer wrote in the wrong time, by 12 hours! Alas. Shut up, pay it, and be glad they happen only every 30 years!

Here's how the newest Block of the Month should go together. I am putting off cutting and piecing this until I get another time-sensitive sewing project done—hooded towels—several. In addition to making the larger hooded towels (for larger child or small adult), my friend Autumn suggested I could make infant-size ones—three* per beach towel. I bought four beach towels on clearance this late time we were at the BX and have a dozen small made.

October is already starting out as a busy month. Sunday, October 2nd is Baptismal Bash at our church. It's not unusual to baptize dozens of people, and with the new campus open, they'll have lots of folks to baptize in Midwest City as well. It always so heartening to witness.

And I get to attend a quilt retreat next weekend. It's my first and I expect it to be lots of fun. Who knows, I may actually get something done out of it!

Which reminds me—I'll close on this photo I found online. I used to be this person. Now, I LOVE the feeling of finishing projects!

20 August 2011

Totes-n-hoodies...

Got Chicken Raising Sister's bags done earlier this week. Happily dropped them off Wednesday night. Tah dah! Now I need to brainstorm how I want to use that great typecase.  :-)

Have been thinking about these since a friend mentioned her older son still enjoyed his hoodie towel from when he was a baby, but grew out of it quite a while ago. I could make a bigger one. And one for his little brother, too. (I hear that's what you do when there are multiples in a family.) It took a few weeks for the idea to gel; buy the supplies; find out what colors to use; find some online instructions; and such. Supplies needed: One bath towel; one matching or coordinating hand towel (you'll only use half of it); straight or bias binding.

I decided I wanted to use bias binding, mostly because I chose stripes—the same for both. Ten-plus yards later, I had enough for the hood portion and all around each towel. They went together pretty easily. Here are some basic instructions (she did not bind hers). From here, you can customize the details.

I gave them to the boys' Nana tonight and hope they enjoy them! I'm happy to have another skill set and a relatively quick, easy-make gift option. Win–win!

* * * * *

UPDATE! Here are two very cute boys modeling their hooded towels!